
接着上一篇文章~~~
hx-post 属性
到目前为止,我们一直使用 hx-get 属性从服务器中获取数据,但现在我们将使用 hx-post 属性将数据发送到服务器。
<!DOCTYPE html>
<html lang="en">
<head>
  <meta charset="UTF-8" />
  <meta name="viewport" content="width=device-width, initial-scale=1.0" />
  <title>Document</title>
  <!--可以单独下载htmx.org放到public目录里-->
  <script src="/htmx.org/dist/htmx.js" ></script>
</head>
<body>
  <h1>HTMX</h1>
  <form
          hx-post="/users/create"
          hx-trigger="submit"
          hx-target="#users"
          hx-swap="beforeend"
  >
    <input type="text" name="name" />
    <button type="submit">Add</button>
  </form>
  <span class="htmx-indicator" id="indicator">Loading...</span>
  <h2
          hx-get="/users"
          hx-target="#users"
          hx-indicator="#indicator"
          hx-swap="innerHTML"
          hx-trigger="load"
  >
    用户列表
  </h2>
  <ul id="users"></ul>
</body>
</html>
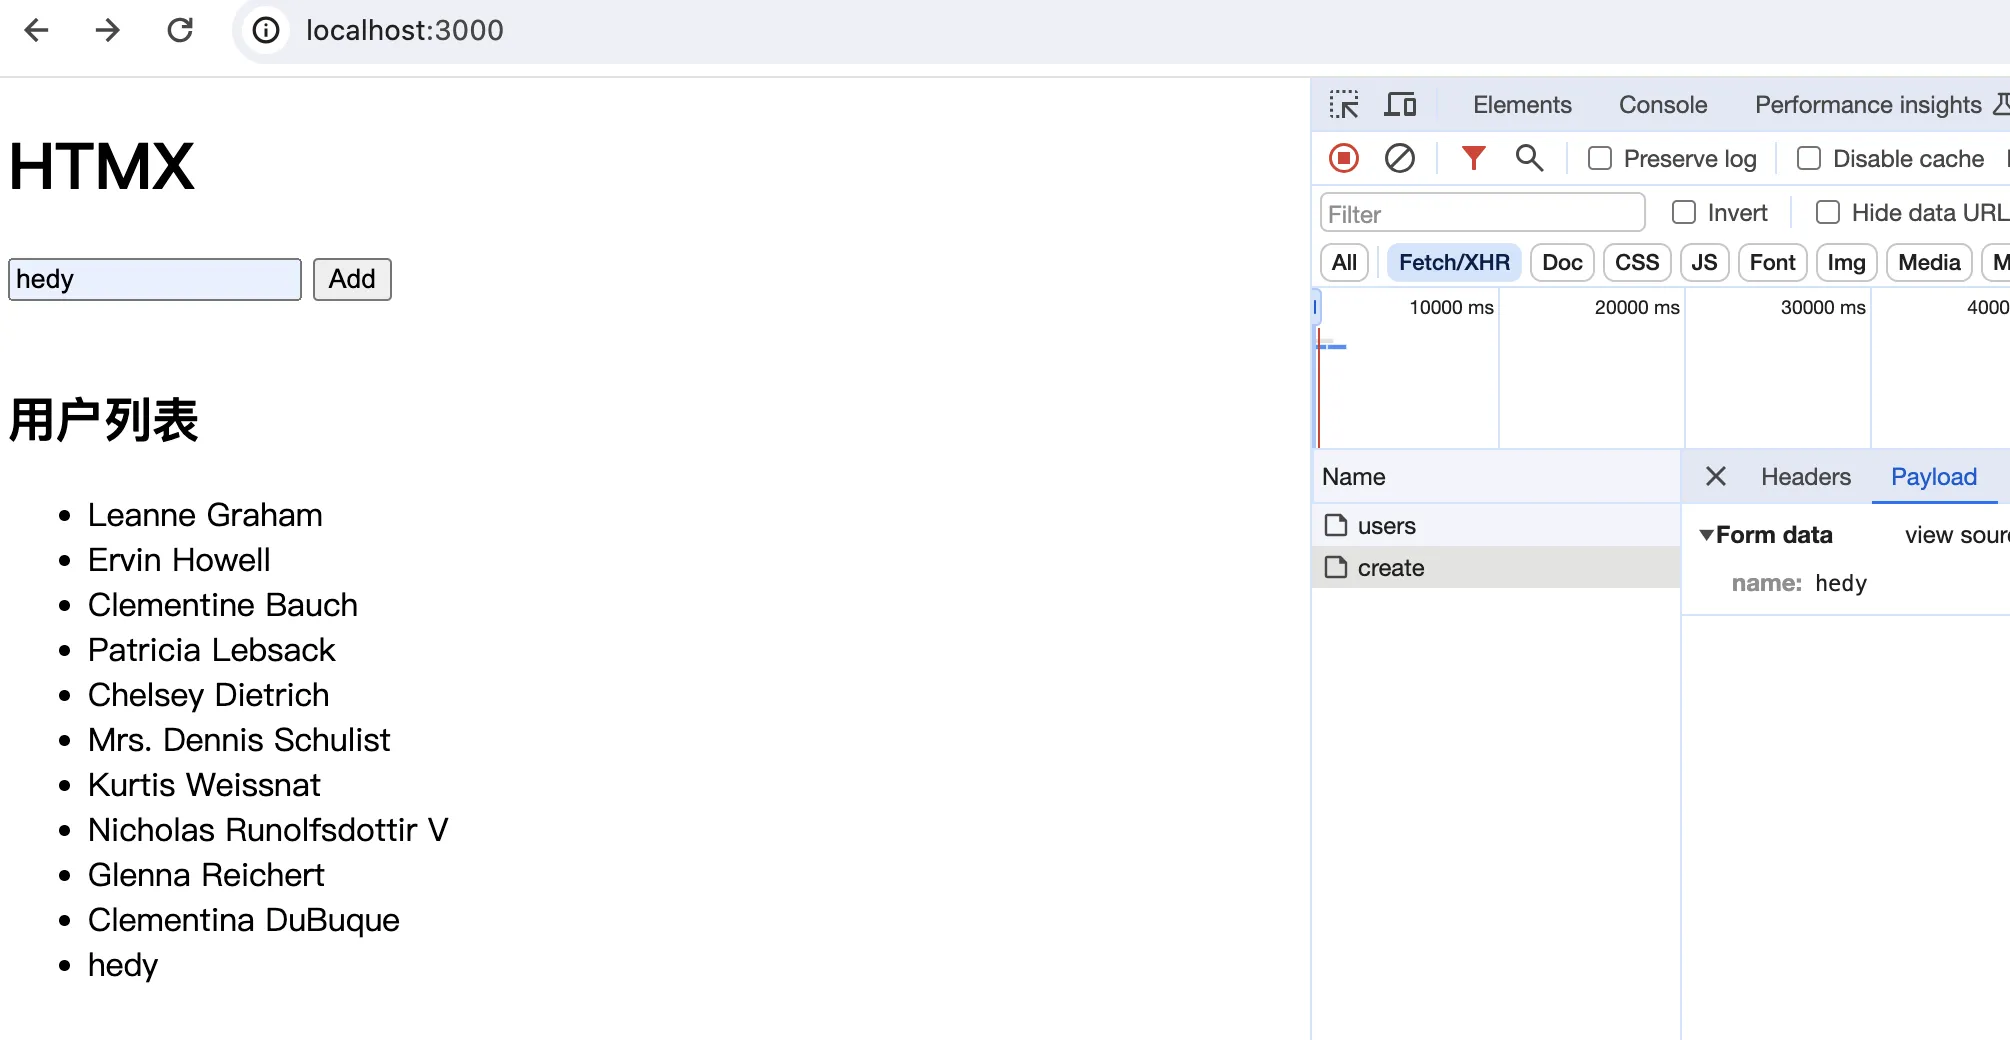
上述代码,我们创建了一个简单的表单,在form标签中设置hx-post、hx-trigger、hx-target和hx-swap属性。hx-swap 属性设置成beforeend ,将会在显示的用户列表的最后一个元素下方添加服务器返回的数据。
当触发hx-trigger属性中的submit事件时,将向hx-post属性中指定的URL /users/create发送POST请求。
在后端服务器端添加/users/create路由。
app.use(express.urlencoded({ extended: true }));
app.post('/users/create', (req, res) => res.send(`<li>${req.body.name}</li>`));
在浏览器上执行时,在输入框中输入的名称将添加到用户列表的底部,如图:
hx-swap-oob 属性
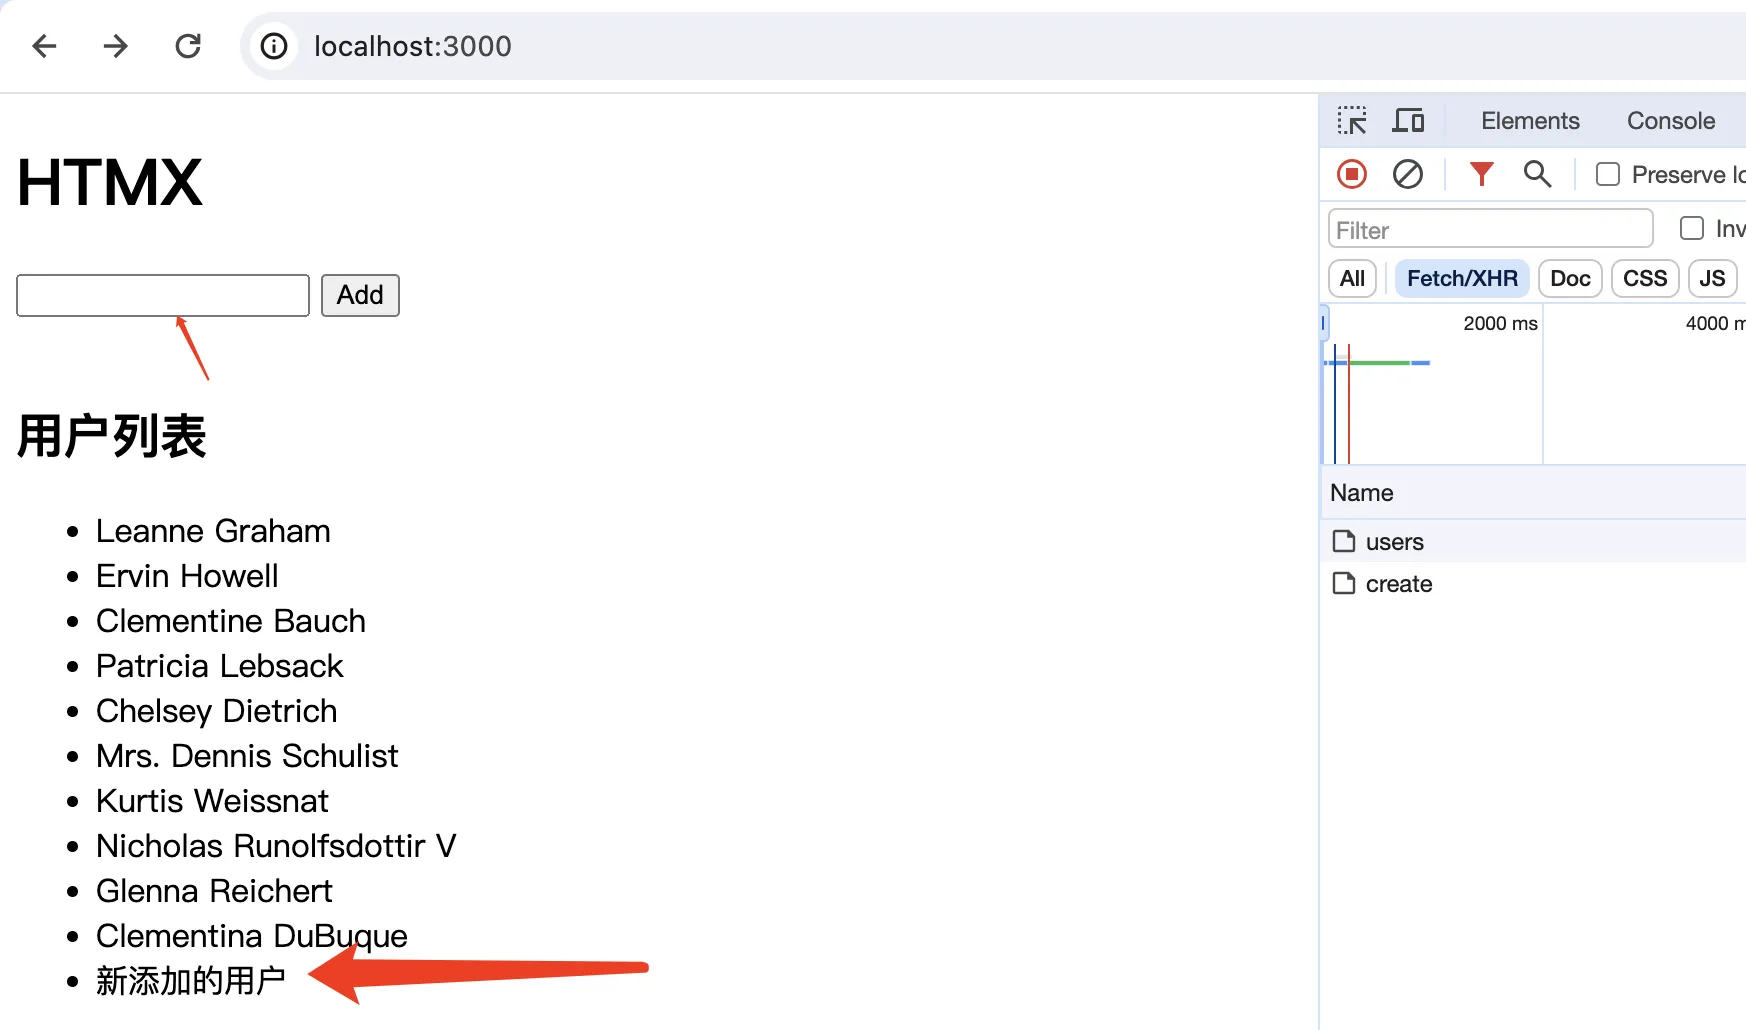
虽然可以在表单中输入名称并将其添加到列表中,但是在input元素中输入的字符串仍然保留在表单中。为了重置输入的字符串,我们将使用hx-swap-oob属性。
在index.html中,input元素上加上一个识别id。
<input type="text" name="name" id="name" />
更新从服务器返回的HTML。添加li标签,并添加一个新的input标签来替换index.html中的input标签。在添加的input标签中,添加hx-swap-oob属性并设置值为true。通过设置id可以识别哪个元素对应的HTML。如果没有设置id,将无法确定替换的元素,因此不会被重置。未指定hx-swap-oob属性的元素将在hx-target指定的位置进行更新。
app.post('/users/create', (req, res) =>
  res.send(
    `<li>${req.body.name}</li><input type="text" name="name" id="name" hx-swap-oob="true" />`
  )
);
设置后,如果在表单中输入名称并点击“Add”按钮,输入的字符串将被插入到列表的最后,并且input元素中输入的值将被重置。
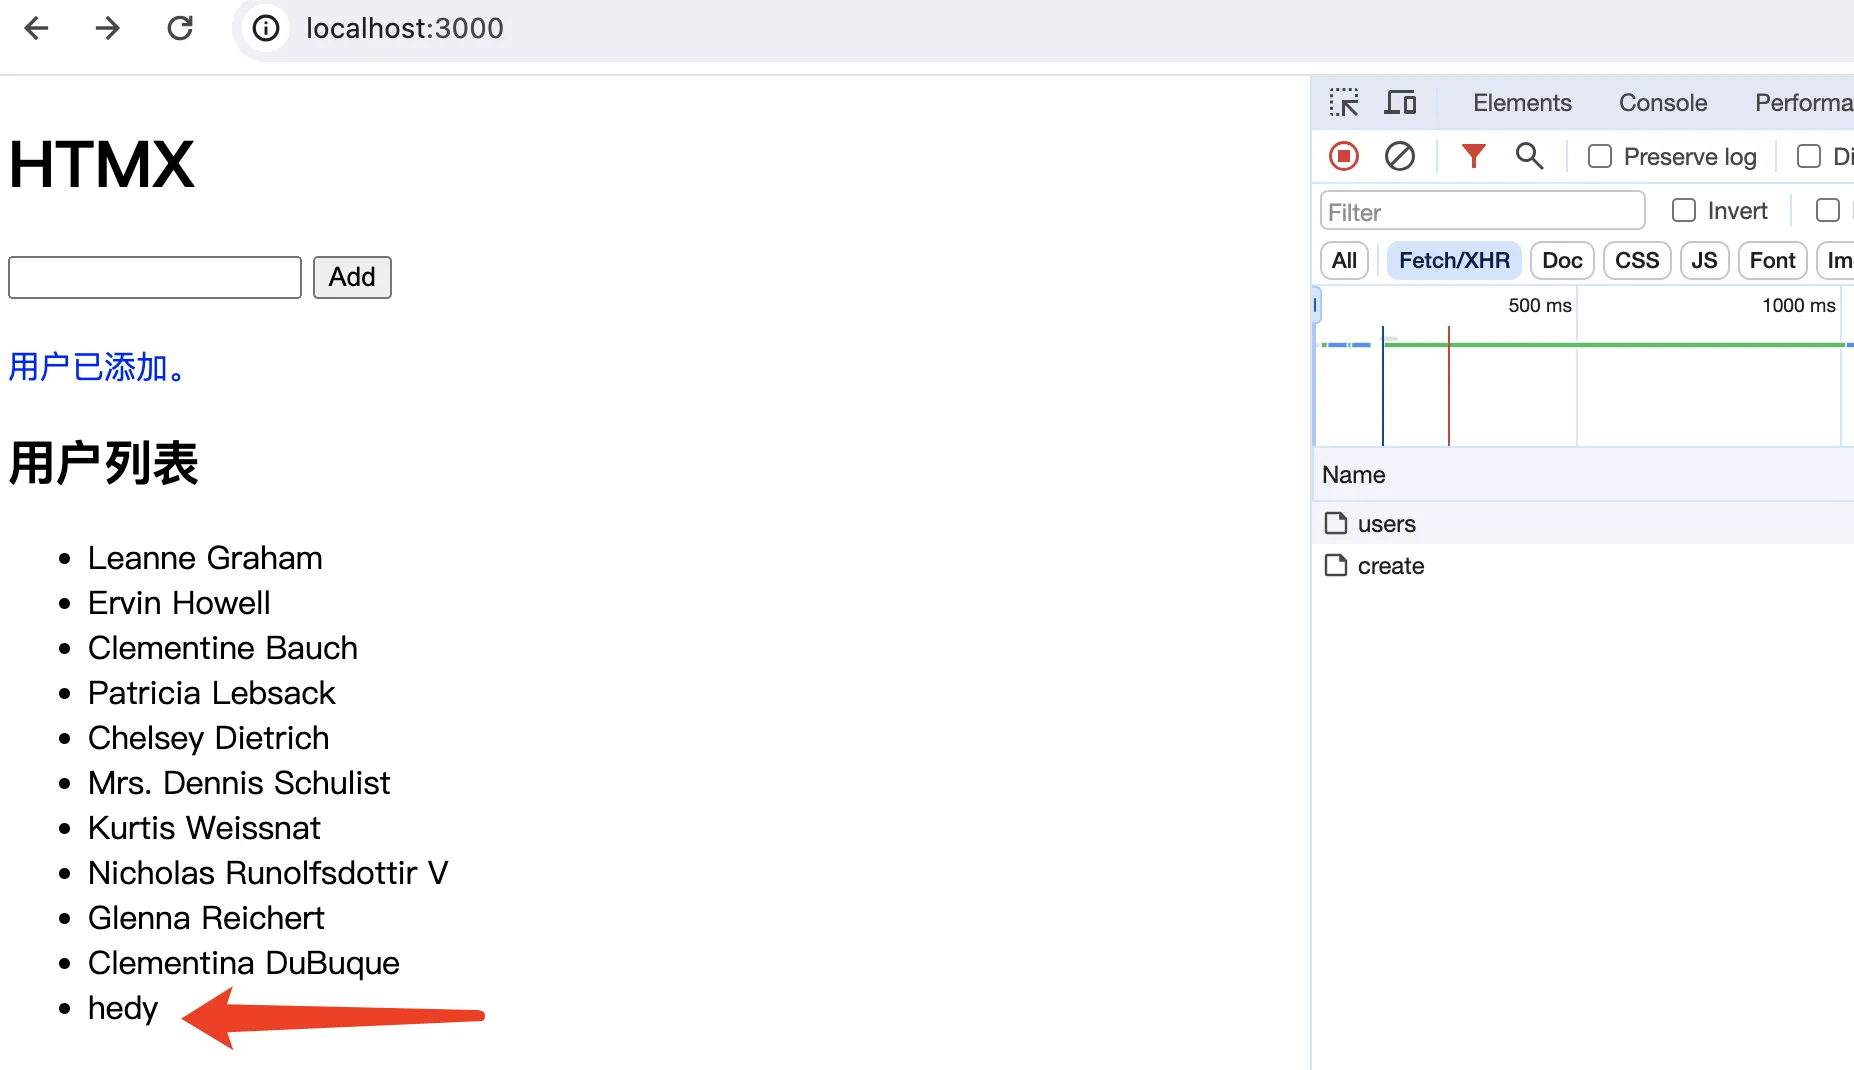
通过使用hx-swap-oob属性,可以更新多个位置(target)。在index.html文件中,已添加一个带有id为message的div元素。
<!DOCTYPE html>
<html lang="en">
<head>
  <meta charset="UTF-8" />
  <meta name="viewport" content="width=device-width, initial-scale=1.0" />
  <title>Document</title>
<!--  <script src="https://unpkg.com/htmx.org@1.9.10" integrity="sha384-D1Kt99CQMDuVetoL1lrYwg5t+9QdHe7NLX/SoJYkXDFfX37iInKRy5xLSi8nO7UC" crossorigin="anonymous"></script>-->
  <script src="/htmx.org/dist/htmx.js" ></script>
</head>
<body>
  <h1>HTMX</h1>
  <form
          hx-post="/users/create"
          hx-trigger="submit"
          hx-target="#users"
          hx-swap="beforeend"
  >
    <input type="text" name="name" id="name" />
    <button type="submit">Add</button>
  </form>
  <span class="htmx-indicator" id="indicator">Loading...</span>
  <div id="message"></div>
  <h2
          hx-get="/users"
          hx-target="#users"
          hx-indicator="#indicator"
          hx-swap="innerHTML"
          hx-trigger="load"
  >
    用户列表
  </h2>
  <ul id="users"></ul>
</body>
</html>
服务器端返回:
app.post('/users/create', (req, res) =>
  res.send(
    `<li>${req.body.name}</li><input type="text" name="name" id="name" hx-swap-oob="true" /><div hx-swap-oob="true" id="message" style="color:blue;">用户已添加。</div>`
  )
);
在表单中输入名称后单击“添加”按钮,则输入的名称将添加到用户列表中,表单将被重置,并显示后端返回的消息。
使用 Alpine.js
Alpine.js 是一个 JavaScript 框架,当你想要向客户端添加动态功能(例如下拉菜单)时使用。
在 head 标签内添加 script 标签,引入Alpine.js。
<!DOCTYPE html>
<html lang="en">
  <head>
    <meta charset="UTF-8" />
    <meta name="viewport" content="width=device-width, initial-scale=1.0" />
    <title>Document</title>
    <script
      src="https://unpkg.com/htmx.org@1.9.10"
      integrity="sha384-D1Kt99CQMDuVetoL1lrYwg5t+9QdHe7NLX/SoJYkXDFfX37iInKRy5xLSi8nO7UC"
      crossorigin="anonymous"
    ></script>
    <script src="//unpkg.com/alpinejs" defer></script> //追加
  </head>
//略
显示消息
在添加用户时,我添加了显示消息的功能。并且,我们使用Alpine.js添加了一个功能,即在显示一段时间后,显示的消息将被删除。这一功能也叫做Flash message。
通过x-data指令,我们定义了变量show并将其设置为true。在x-show指令中,我们可以根据bool值切换元素的显示和隐藏。初始显示后,show的值为true,所以会显示。x-init指令让我们在初始化时执行代码,所以在初始显示后,我们使用setTimeout设置了两秒后show的值变为false。
app.post('/users/create', (req, res) =>
  res.send(
    `<li>${req.body.name}</li>
    <input id="name" type="text" name="name" hx-swap-oob="true" />
    <div hx-swap-oob="true" id="message" style="color:blue;" x-data="{show:true}" x-show="show" x-init="setTimeout(()=> show=false,2000)">用户已添加。</div>`
  )
);
设置后,返回的“用户已添加”信息显示2秒后自动消失。
上传文件
我们将查看使用HTMX进行文件上传的方法:
- 设置
input元素的type属性为file - 在
form标签中设定以下属性:hx-posthx-indicatorhx-triggerhx-targethx-encoding: 虽然是首次使用,但是在编码从常规的application/x-www-form-urlencoded转义成multipart/form-data时,需要进行设置,这和在普通的文件上传表单中设置enctype=”multipart/form-data"的操作是一样的。
<body>
  <h1>HTMX</h1>
  <div id="message"></div>
  <form
    hx-post="/file_upload"
    hx-indicator="#indicator"
    hx-trigger="submit"
    hx-target="#message"
    hx-encoding="multipart/form-data"
  >
    <input type="file" name="file" id="file" /><br /><br />
    <button type="submit">Upload</button>
  </form>
  <span class="htmx-indicator" id="indicator">Uploading...</span>
</body>
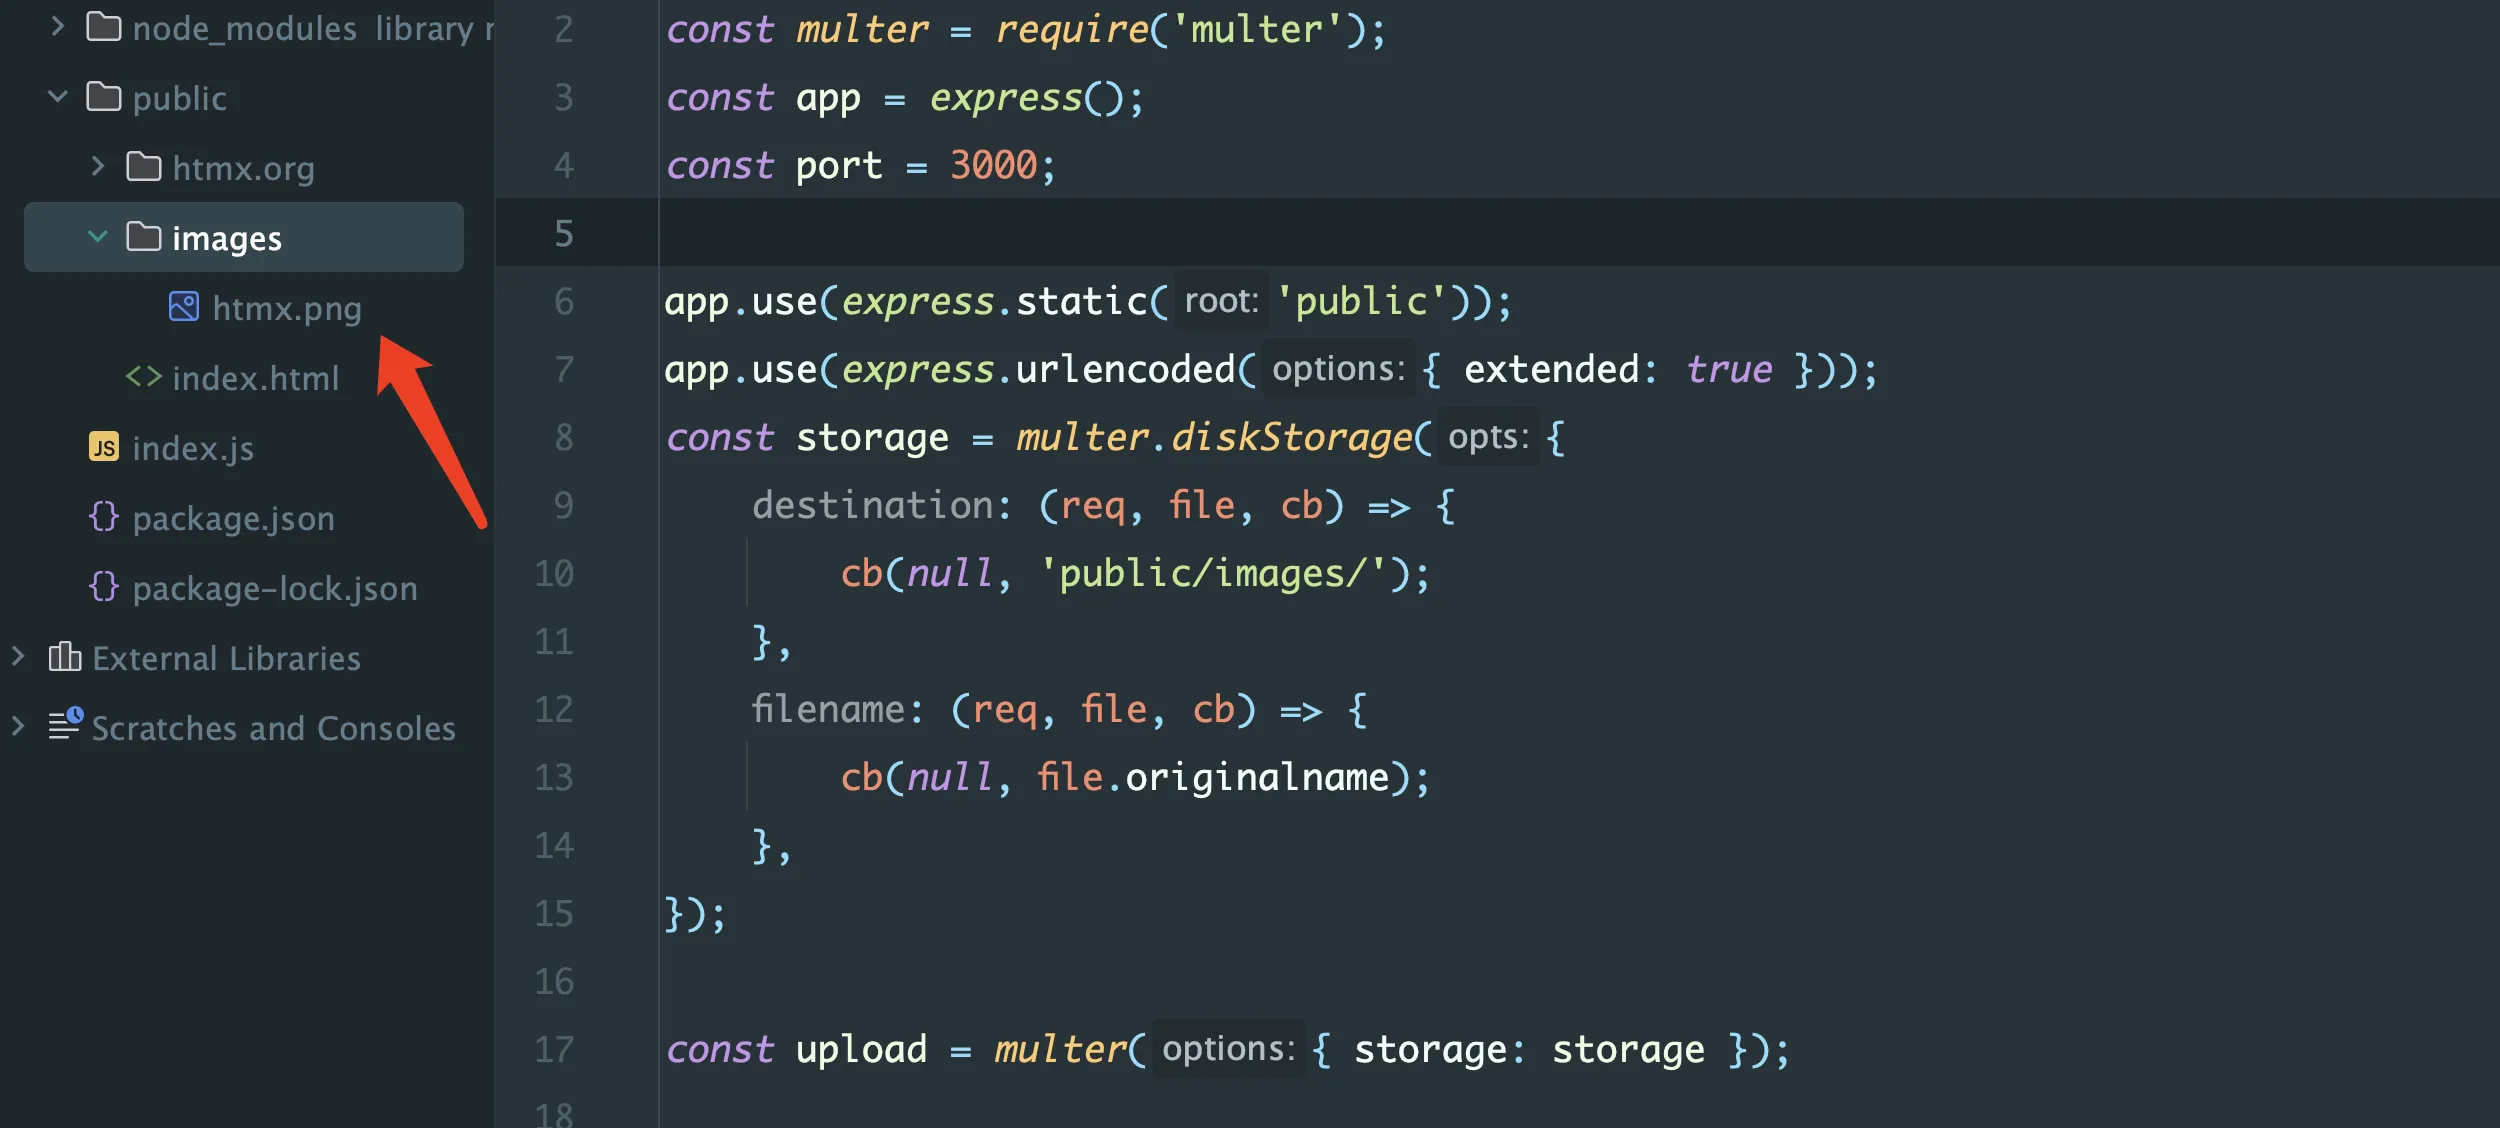
配置multer模块
在Express中,你可以使用multer模块来保存文件。
const express = require('express');
const multer = require('multer');
const app = express();
const port = 3000;

app.use(express.static('public'));
app.use(express.urlencoded({ extended: true }));

const storage = multer.diskStorage({
  destination: (req, file, cb) => {
    cb(null, 'public/images/');
  },
  filename: (req, file, cb) => {
    cb(null, file.originalname);
  },
});

const upload = multer({ storage: storage });

app.post('/file_upload', upload.single('file'), (req, res, next) => {
  console.log(req.file);
  res.send(
    '<input type="file" name="file" id="file" hx-swap-oob="true" /><div x-data="{show:true}" x-show="show" x-init="setTimeout(()=> show=false,2000)">文件上传完成</div>'
  );
});

app.listen(port, () => console.log(`Example app listening on port ${port}!`));
从表单中选择一个文件并单击“上传”按钮时,在文件上传过程中,会显示Uploading,上传成功后图片会被保存在public/images目录下。浏览器上将显示“文件上传完成”消息,但由于使用了 Alpine.js,因此该消息将在 2 秒后从浏览器中消失。
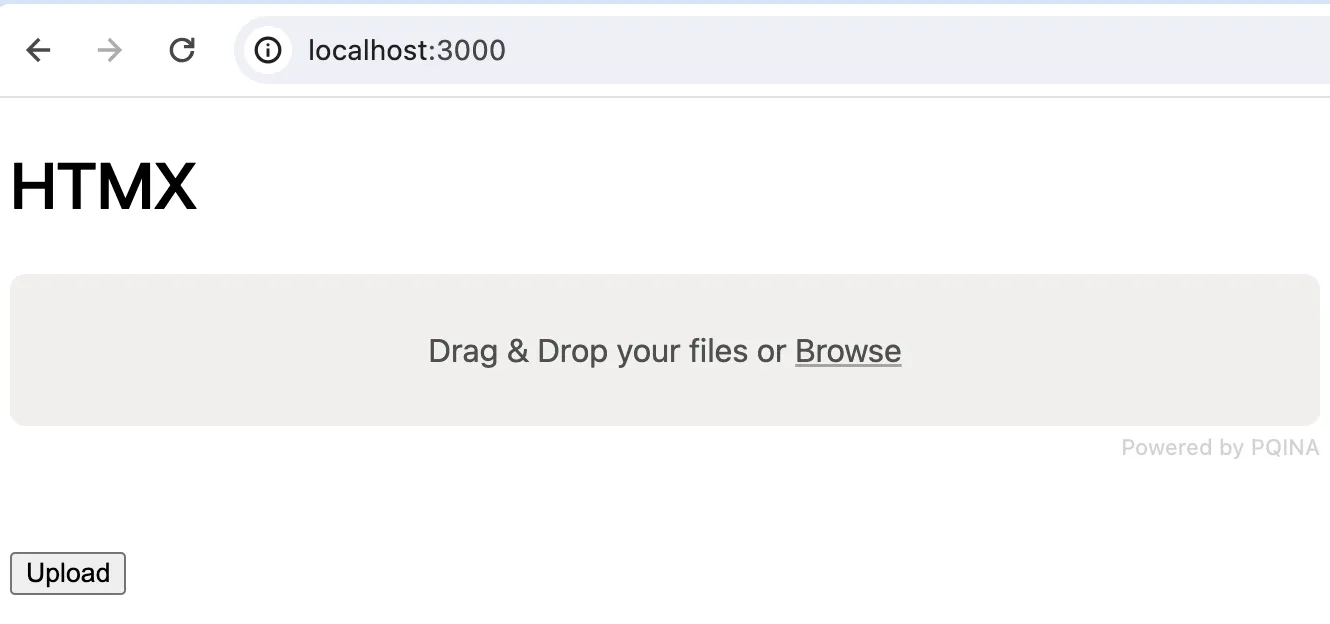
使用文件池
如果你想通过拖拽上传文件,可以使用Filepond。虽然Filepond与HTMX没有直接关系,但如果你想在HTMX中实现更多的交互功能,也可以使用。
首先在需要在index.html中通过link标签添加Filepond的CSS,并通过script标签设置Filepond的JavaScript 。
<!DOCTYPE html>
<html lang="en">
<head>
    <meta charset="UTF-8" />
    <meta name="viewport" content="width=device-width, initial-scale=1.0" />
    <title>Document</title>
    <script
            src="https://unpkg.com/htmx.org@1.9.10"
            integrity="sha384-D1Kt99CQMDuVetoL1lrYwg5t+9QdHe7NLX/SoJYkXDFfX37iInKRy5xLSi8nO7UC"
            crossorigin="anonymous"
    ></script>
    <script src="//unpkg.com/alpinejs" defer></script>
    <link
            href="https://unpkg.com/filepond@^4/dist/filepond.css"
            rel="stylesheet"
    />
</head>
<body>
<h1>HTMX</h1>
<div id="message"></div>
<form
        hx-post="/file_upload"
        hx-indicator="#indicator"
        hx-trigger="submit"
        hx-target="#message"
        hx-encoding="multipart/form-data"
>
    <input type="file" name="file" id="file" /><br /><br />
    <button type="submit">Upload</button>
</form>
<span class="htmx-indicator" id="indicator">Uploading...</span>
<script src="https://unpkg.com/filepond@^4/dist/filepond.js"></script>
<script>
    const inputElement = document.querySelector('input[type="file"]');
    const pond = FilePond.create(inputElement, {
        storeAsFile: true,
    });
</script>
</body>
</html>
需要指定input元素作为FilePond.create方法的第一个参数,然后在第二个参数中将storeAsFile设置为true。通过将storeAsFile设置为true,可以在input元素中保存上传的文件。
页面显示如下:
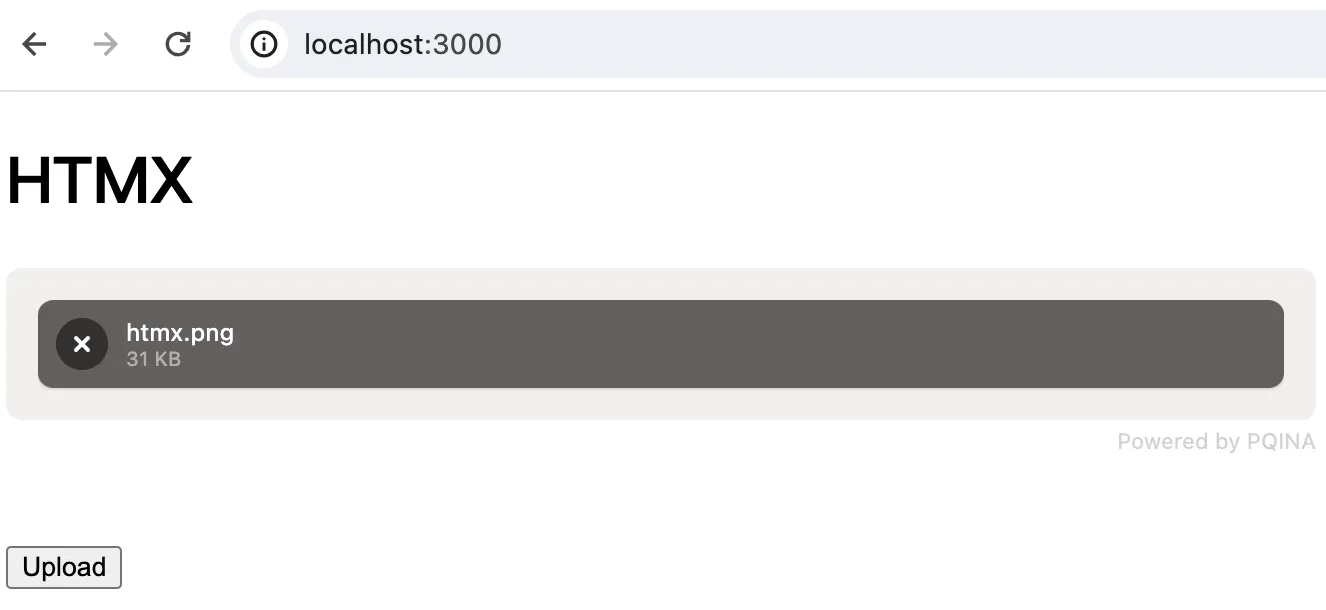
 可以拖拽文件到拖放区域,将显示文件名和大小。如果单击“上传”按钮,文件将被上传。


评论(0)