
Thymeleaf已经迅速成为Spring MVC的事实标准(HTML)模板引擎。它拥有丰富的功能、扩展、花里胡哨的东西。但是,为了开始使用,你只需要知道一些基础知识。
在这里,我将快速介绍它们。
添加Thymeleaf到你的项目中
注意:我假设你正在使用Spring Boot和Gradle作为构建工具。如果不是这样,你可能需要执行一些额外的步骤,但是这里的关键点仍然适用。
只需将Thymeleaf添加到你的_build.gradle_文件中即可:
compile('org.springframework.boot:spring-boot-starter-thymeleaf:1.3.1.RELEASE')
为了演示功能,我们还将添加Twitter Bootstrap webjar:
compile('org.webjars:bootstrap:3.3.6')
更新:“布局方言已经作为Spring Boot 1.x中Thymeleaf起始包的一部分包含在内,但在Spring Boot 2中已被删除。”
如果你正在使用Spring Boot 2,则需要进行额外的配置步骤。点击这里查看详情。
太棒了!现在你已经将Thymeleaf作为你的服务器端HTML模板引擎。让我们开始吧。
Thymeleaf会自动从_resources/templates_目录中获取你的模板文件:

因此,请确保将所有模板放在此处,并将它们命名为whatever.html。Thymeleaf模板也是有效的HTML文件。
在开发过程中,你需要关闭Thymeleaf缓存,否则你将经常看到过时的模板版本。
这可以在你的_application.properties_文件中轻松配置:
spring.thymeleaf.cache=false
创建默认布局模板
我们将从创建一个_default layout template_开始,它将为我们所有的页面提供一个标准结构。
这通常是一个很好的实践,因为这意味着我们不必在每个新页面中重新定义样板布局。我们只需关注该页面唯一的内容。这个_default layout template_将导入我们始终想要访问的所有标准CSS和javascript资源;如果这个集合在将来发生了变化(例如,我们想要将Google Analytics代码添加到每个页面),我们只需在一个地方添加它即可。
我们将命名我们的默认布局模板为_default.html_,并将其添加到我们的_resources/templates_目录中。
以下是它的内容:
<!DOCTYPE html>
<html lang="en"
      xmlns:th="http://www.thymeleaf.org"
      xmlns:layout="http://www.ultraq.net.nz/thymeleaf/layout">
    <head>
        <meta charset="UTF-8"/>
        <title>Default title for my pages</title>

        <link rel="stylesheet" href="/webjars/bootstrap/3.3.6/css/bootstrap.min.css"/>
        <link rel="stylesheet" href="/webjars/bootstrap/3.3.6/css/bootstrap-theme.min.css"/>
    </head>
    <body>        <div class="container">
            <div class="row">
                <div class="col-md-3"></div>
                <div class="col-md-6" layout:fragment="content">
                        Page content goes here
                </div>
                <div class="col-md-3"></div>
            </div>
        </div>

        <script src="/webjars/jquery/1.11.1/jquery.min.js"></script>
        <script src="/webjars/bootstrap/3.3.6/js/bootstrap.min.js"></script>
        <th:block layout:fragment="scripts"></th:block>
    </body>
</html>
从我们_body_标签的内容中,你可以看到我们使用了bootstrap来为我们的网站定义了一个非常基本的结构,由3列组成,只有中间的列包含任何内容。这给了我们一个基本的居中外观,留下了我们内容的左右空间。
你应该注意到几件事情:
- Thymeleaf命名空间(th_和_layout)已在模板顶部定义。这些很重要,因为我们将在整个过程中使用它们。
- 我们为页面指定了一个默认标题(“Default title for my pages”)。这实际上并不是必需的,只要在所有页面中覆盖它即可,但是在这里添加一个可以在许多页面想使用默认标题时很有用。
- 通过在前面的gradle文件中包含Twitter Bootstrap,bootstrap资源会自动在/webjars/文件夹中提供。然后我们在这里包含它们,以便它们在我们所有的页面中都可用。
- 在页面底部,我们包含了我们的javascript文件。前两个是bootstrap和jquery(都在webjars文件夹中)。第三个是我们自己需要的一个片段。我们将在稍后使用它来向我们的页面添加自定义javascript文件。
- 最后,请注意我们布局中的中间列也是一个名为“content”的片段。这是我们将在每个页面中提供内容的片段,以便为该页面填充唯一的中央列内容。
Hello World页面
好了,我们准备创建我们的第一个页面。
让我们称之为_hello.html_,并再次将其放在_resources/templates_目录中。它将如下所示:
<!DOCTYPE html>
<html lang="en"
      xmlns:th="http://www.thymeleaf.org"
      xmlns:layout="http://www.ultraq.net.nz/thymeleaf/layout"
      layout:decorator="default">
    <head>
        <title>Hello world page</title>
        <link rel="stylesheet" href="/css/hello.css"/>
    </head>
    <body>
        <div layout:fragment="content">
            <h1>Hello world</h1>
        </div>
    </body>
    <th:block layout:fragment="scripts">
        <script src="/js/hello.js"></script>
    </th:block>
</html>
你可能首先注意到的是,即使我们在default.html模板中已经添加了html、head和body标签,我们在这里也要再次添加它们。这是Thymeleaf的一个特点:它被设计为每个单独的模板实际上都是可以完美渲染的。这样,任何客户端开发人员/设计师都可以拿取任何页面,只需在浏览器中编辑/打开即可,无需运行服务器。对于团队非常有用。
从此示例中需要注意的关键事项:
- 在页面顶部附近,我们已经指定我们的“decorator”(默认布局模板)是_default.html_模板。这将告诉Thymeleaf渲染引擎使用我们的default.html模板来装饰此页面(在服务器上运行时)。
- 我们通过将其添加到_HEAD_标签中来覆盖页面标题。
- 我们向我们的页面添加了一个额外的CSS文件(/css/hello.css)。注意:这将不会替换default.html中包含的CSS文件,而只是添加到其中。
- 我们通过添加H1 Hello World元素来定义“content”片段(在我们的default.html模板中声明)。这是要在我们页面的中央列中显示的内容。
- 在页面底部,我们添加了一个额外的js文件。我们也可以将其添加到我们的HEAD元素中,但问题是,如果我们的javascript文件需要访问jquery,那么它将失败,因为jquery直到页面末尾才定义。通过将它添加到这个片段中,我们的javascript文件(/js/hello.js)是浏览器评估的最后一个文件(在jquery和bootstrap初始化之后)。不错,我们现在有了一个标准模板,以及使用它的 Hello World 示例。但是,我们如何测试它呢?
我们还有一些步骤要做。首先,我们需要把我们引用的 hello.css 和 hello.js 文件放在某个地方,其次,我们需要一个控制器来呈现页面。
现在让我们完成这些步骤。
静态资源
静态资源只需要放在 resources/static 目录下,与 resources/templates 目录并列:

由于本文的重点是 HTML 模板,而不是 CSS/JS,这是我将要提到的唯一一次有关 css/js 文件的提及。基本上,通过将你的 css 和 js 文件添加到上面显示的目录中,Spring MVC 会自动将它们提供在 /css/*.css 和 /js/*.js 上。
Hello World 控制器
我们需要的最后一件事是一个控制器来呈现模板。
Spring MVC 使得编写控制器非常简单:
@Controller
public class HelloController {

    @RequestMapping("/hello")
    public String hello() {
        return "hello";
    }
}
你需要注意的只有两件事:
- 控制器将请求映射到 /hello 的页面(所以如果在本地运行,页面将在 http://localhost:8080/hello) 上可用)
- 控制器返回“hello”,这意味着“呈现 hello.html 模板”。Thymeleaf 知道在 resources/templates 目录中查找它。
就是这样。Hello World 已经可以运行了。启动你的 Spring MVC 服务器,并将浏览器导向 http://localhost:8080/hello。
你将看到以下页面内容被呈现:
<!DOCTYPE html>
<html lang="en">
    <head>
        <title>Hello world page</title>
        <meta charset="UTF-8" />
        <link rel="stylesheet" href="/webjars/bootstrap/3.3.6/css/bootstrap.min.css" />
        <link rel="stylesheet" href="/webjars/bootstrap/3.3.6/css/bootstrap-theme.min.css" />
        <link rel="stylesheet" href="/css/hello.css" />
    </head>
    <body>
        <div class="container">
            <div class="row">
                <div class="col-md-3"></div>
                <div class="col-md-6">
                    <h1>Hello world</h1>
                </div>
                <div class="col-md-3"></div>
            </div>
        </div>
        <script src="/webjars/jquery/1.11.1/jquery.min.js"></script>
        <script src="/webjars/bootstrap/3.3.6/js/bootstrap.min.js"></script>
        <script src="/js/hello.js"></script>
    </body>
</html>
注意,default.html 和 hello.html 的内容已经合并在一起了,就像我们期望的那样。
注入模型参数
接下来,让我们注入一些来自服务器的内容。
更新你的控制器如下:
@RequestMapping("/hello")
public String hello(Model model) {
    model.addAttribute("name", "Tom");
    model.addAttribute("formatted", "<b>blue</b>");
    return "hello";
}
并将你的 hello.html 文件中的“content”片段更新为以下内容:
<div layout:fragment="content">
    <span th:text="|Hello ${name}|"/>, did you know that <span th:utext="${formatted}"/> is <span th:text="${formatted}"/> in HTML?
</div>
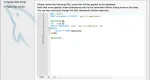
这里,我们为我们的模型提供了两个属性(“name”和“formatted”),并将它们作为我们内容的一部分呈现。最终结果将看起来像这样:

我们在这里应用了一些技术:
- 第一个是 th:text,它告诉 Thymeleaf:用引号中的值替换此元素的内容。
- 第二个是 $ 语法(例如,th:text=“${formatted}”)。这允许我们将模型属性直接放入我们的内容中。
- 第三个是“|…|”语法(例如,th:text=“|Hello ${name}|”)。这允许我们进行字符串插值,其中模型变量被放置在正常文本内部。这与 th:text=“${formatted}”不同,后者仅使用模型属性的值(没有字符串插值)。
- 第四个是 th:utext,它告诉 Thymeleaf:不要转义被注入的文本(即 Un-escaped Text);这就是为什么蓝色实际上在上面被加粗的原因。
这就是将模型参数注入到 Thymeleaf 模板的基本原则。接下来,我们将看一些更加强大的内容。
动态列表/行的内容
通常,你会有一个要在页面上呈现的项目列表或数组。Thymeleaf 让这个变得容易。
首先,让我们更新我们的 HelloController 以包含一个项目列表:
@Controller
public class HelloController {

    @RequestMapping("/hello")
    public String hello(Model model) {
        DeveloperResource[] devResources = {
                new DeveloperResource("Google",
                     "http://www.google.com"),
                new DeveloperResource("Stackoverflow",
                     "http://www.stackoverflow.com"),
                new DeveloperResource("W3Schools",
                    "http://www.w3schools.com")
        };
        model.addAttribute("resources", devResources);
        return "hello";
    }

    public static final class DeveloperResource {
        private final String name;
        private final String url;

        public DeveloperResource(String name, String url) {
            this.name = name;
            this.url = url;
        }

        public String getName() {
            return name;
        }

        public String getUrl() {
            return url;
        }
    }
}
现在更新我们的 hello.html 模板以呈现此列表:
<div layout:fragment="content">
    <div class="list-group">
        <a th:each="resource : ${resources}"
           th:href="${resource.url}" class="list-group-item">
            <b th:text="${resource.name}"></b>
        </a>
    </div>
</div>
在浏览器中加载此内容,呈现的 HTML 将如下所示:
<div class="list-group">
    <a class="list-group-item" href="http://www.google.com">
        <b>Google</b>
    </a>
    <a class="list-group-item" href="http://www.stackoverflow.com">
        <b>Stackoverflow</b>
    </a>
    <a class="list-group-item" href="http://www.w3schools.com">
        <b>W3Schools</b>
    </a>
</div>
而视觉结果实际上将看起来像这样:

很棒,正是我们想要的。但是,这是如何实现的呢?
让我们再次快速查看 hello.html 模板:
<div layout:fragment="content">
    <div class="list-group">
        <a th:each="resource : ${resources}"
           th:href="${resource.url}" class="list-group-item">
            <b th:text="${resource.name}"></b>
        </a>
    </div>
</div>
“list-group”和“list-group-item”类只是 Twitter Bootstrap 类,给我们提供了上面看到的外观和感觉。
真正的 Thymeleaf 魔法来自于 th:each。它循环遍历“resources”模型属性中的每个项目(适用于任何 Java Iterable),并创建一个 Thymeleaf 变量“resource”来表示每个项目。
然后我们看到了另一个重要的 Thymeleaf 属性 th:href 的使用。这用于设置给定锚元素(<a href=“…”>…</a>)上的 href 属性。请注意,几乎可以为你想要设置的每个可能的 HTML 标记属性找到匹配的 Thymeleaf 属性(http://www.thymeleaf.org/doc/tutorials/2.1/usingthymeleaf.html#setting-value-to-specific-attributes)。
最后要注意的是 Thymeleaf 的 OGNL(对象图表示语言)。它基本上是一种点表示法,允许访问 Java 对象内的属性(通过 getter)。在这里,你可以看到我们已经使用 ${resource.url} 来访问我们的 DeveloperResource 对象的 getUrl() 属性,${resource.name} 来访问 getName()。注意:只要字段都可以通过 getter 访问,它也可以在多层嵌套中工作(例如 ${resource.name.class.simpleName})。## 条件语句
如果我们只想在满足某些条件时才呈现特定的 HTML 元素或块,该怎么办呢?
我们来扩展一下我们现有的 hello.html 模板,以包含这种情况。
在我们的内容块开头添加以下行:
<span th:if="${resources.size() == 0}">No resources found.
这样,如果我们的“resources”模型属性为空,就会出现有用的信息提示消息。
只有当资源数组大小为 0 时,“No resources found” span 元素才会呈现在 HTML 中。
表单
我们通常希望使用表单将数据提交到服务器。为了在不同的场景中重用模板,能够从服务器指定表单的 action 属性非常有用。
你可能已经猜到了该怎么做:
<div layout:fragment="content">
    <form th:method="POST" th:action="${action}">
        <div class="form-group">
            <label>Name:</label>
            <input class="form-control" name="name">
        </div>
        <button type="submit" class="btn btn-default">Submit</button>
    </form>
</div>
正如预期的那样,我们只需使用 th:action 属性而不是普通的 action 属性。
然而,你还会注意到,我们还使用了 th:method 属性来指定表单 method:
<div layout:fragment="content">
    <form th:method="POST" th:action="${action}">
        <div class="form-group">
            <label>Name:</label>
            <input class="form-control" name="name">
        </div>
        <button type="submit" class="btn btn-default">Submit</button>
    </form>
</div>
既然我们没有为此字段使用模型属性,为什么还要使用 Thymeleaf 语法呢?
原因在于,Thymeleaf 还自动提供了非常有用的功能,可以为我们的表单自动添加 CSRF 令牌;但是,只有当我们使用 th:action 和 th:method 分别设置 action 和 method 属性时,才会这样做。
这很重要,因为如果你使用 Spring Security,则你的服务器将受到 CSRF 保护(应该如此),任何 POST/PUT/DELETE 请求都将自动失败;除非它们带有 CSRF 令牌。
只需使用 Thymeleaf(th:method 和 th:action)在表单上设置 method 和 action 属性,你就可以自动将 CSRF 令牌注入到你的表单中。
上述表单的渲染结果如下:
<form method="POST" action="/myaction">
    <div class="form-group">
        <label>Name:</label>
        <input class="form-control" name="name" />
    </div>
    <button type="submit" class="btn btn-default">Submit</button>
    <input type="hidden" name="_csrf" value="e26856cf-7535-42e9-9afa-49b06aa6fa71" />
</form>
正如你所见,Thymeleaf 已经自动为你在表单底部添加了 CSRF 令牌。
好极了。
总结
Thymeleaf 比这个更多的内容(在这里详细介绍),但是这里应该足以让你入门了。
总结:
- 将 Thymeleaf 添加到 Spring Boot MVC 项目很容易:
compile(‘org.springframework.boot:spring-boot-starter-thymeleaf:1.3.1.RELEASE’)
- 记得在开发过程中关闭 Thymeleaf 缓存:
spring.thymeleaf.cache=false
- layout:decorator 和 layout:fragment 可用于在所有模板中重用代码。
- th:text 和 th:utext 将 HTML 标签的内容用服务器端内容“替换”。
- ${name} 和 |Hello ${name}| 分别将模型参数和字符串插值模型参数注入到模板中。
- th:each 将循环遍历 Java 可迭代对象,并为每个项目生成内容。
- Thymeleaf 为几乎所有标准 HTML 属性提供了自定义属性(例如 th:href)(更多详细信息在这里)。
- Thymeleaf 的 OGNL 允许你通过 getter 访问模型参数的嵌套属性(例如 ${resource.name.class.simpleName})。
- th:if 仅在表达式的值为 true 时呈现给定的 HTML 元素。
- 创建表单时,始终使用 th:method 和 th:action,这样你就可以直接获得 CSRF 保护。


评论(0)